|
11: Convey Water In Swales
Vegetated swales are linear, channeled depressions containing vegetation in the landscape that convey runoff from a variety of surfaces. Swales are sometimes referred to as fancy ditches, which is about right. As runoff passes through the swale, some water infiltrates into the soil. But the primary function of these facilities is to convey runoff slowly and treat it. Plants will enhance this, but are not absolutely necessary, for conveyance.
Siting
Conveyance swales will probably be most often used by homeowners to move runoff from a downspout to someplace else in their yard, like a rain garden. Conveyance swales are a great substitute for pipes. The slopes cause water to flow in the direction you’d like to move your runoff.
The amount of runoff that might infiltrate as it moves along the swale will vary with the centerline slope of the swale (the difference in elevation between the top/start and bottom/mouth of the swale). Steeper swales convey water faster and infiltrate (absorb and allow water to pass through) less than shallow swales. Regardless, anywhere a swale is used near a building or the top of wall, it should be lined for the first 10’ to prevent basement flooding or wall destabilization. See “8 Site Bioretention for Infiltration” for appropriate setbacks needed for infiltration.
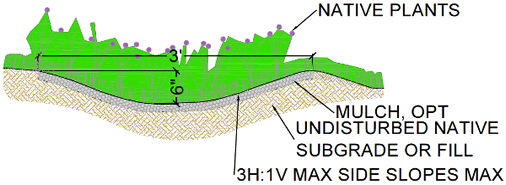
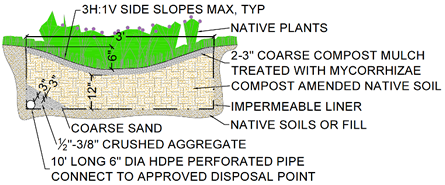
After water has been conveyed to a point where infiltration is appropriate, an unlined swale, which is much easier to construct, may be used (see Figures 2 & 3). Even a small infiltration area to reduce runoff a little bit will still be beneficial to downstream waterways.
Design
Swale design can be complicated and requires an understanding of open channel hydraulics (see Figures 2 & 3). The width and depth of a swale needed to convey runoff depends on storm intensity, rainfall distribution, runoff contribution area and length, roughness, slopes of the sides, and channel shape. Following the guidelines offered here, your channel is likely to be over-designed, but will safely convey runoff away from structures.
Erosion
Erosion is a problem in everybody’s yard and varies with soil type. It’s also a problem in everyone’s watershed. Sediment causes cloudy (aka turbid) water that reduces water quality and habitat value. When runoff is concentrated with a downspout or pipe and deposited at the top of a conveyance swale with soil in the bottom (instead of concrete, for instance), erosion is much likely and the speed at which water flows must be controlled. To control erosion, longitudinal swale slope (steepness of the channel from the top/start and bottom/mouth of the swale) should be limited to a maximum of 5% and a stilling basin (aka energy dissipater) should be used where a concentrated point of water is deposited from a pipe.
Vegetation & Soil Depth
Swales can be planted with a variety of plant types, but trees are probably not practical for the relatively small swales used at the residential scale. For lined swales, providing enough soil for rooting depth is important for long-term plant health, which in turn, reduces water demand and the need for fertilizers (a common pollutant in our waterways). For grasses, the rule of thumb is that they need a rooting depth equal to how tall they will be allowed to grow. So, for lawns mowed to a height of 3”, rooting depth is about 3”, but for grasses that will not be mowed, like the numerous attractive native grasses, a rule of thumb is to provide a minimum of 12” of soil. Short shrubs can get by on 18” of soil, but tall shrubs need 24”.
 |
|
In unlined swales, soil depth will probably not be limited. However, some sites may have a shallow depth of soil over rock fill. Dig down a foot or two to confirm that there’s a suitable depth and quality (10% organic matter is ideal) of soil. If not, amend soils or replace with amended planter soil per guidance provided in “10 Amend Soils for Bioretention”.
Rock Swales
Rock swales are an easy and cost-effective way to move water around a site. Avoid rounded river rock mined from waterways, which causes down-cutting and erosion in the stream channel and other biological and water quality impacts to the stream it was taken from. Over geologic time periods, rounded river rock might be deposited far from a waterway where it can be mined. This upland source of rock is better for protecting overall watershed health. A safer, less impactful way to go is to use crushed, angular aggregate.
Liner Specifications
Liners for filtration facilities or any other purpose should be:
- 30 to 60 mil (mm) EPDM rubber (ethylene propylene diene monomer)
- bentonite clay mat
- 30 to 60 mil LDPE (Low density polyethylene) plastic (aka pond liners)
Install liners per manufacturer recommendations. |
Avoid:
- asphalt products, which are subject to degradation from soil microbes.
- PVC (poly vinyl chloride) which is more polluting than alternatives.
|
Cross Section
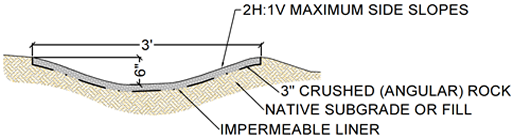
The shape of the swale impacts how much water can be conveyed. Use a parabolic shape (imagine a trench roughly in the shape of a soft V or the end of an egg) as shown in all the figures in this guidance. A 3H:1V (horizontal:vertical) side slope is best for plant establishment and therefore will reduce erosion. Plants on steeper slopes have difficulty rooting. Considering the variation in flows that could occur, we recommend a minimum 3’ wide swale. With this 3’ width, 3:1 side slopes dictate a maximum possible depth of 6”.
Swale Depth
In many storms, you may not see much water running down your swale. However, there’s always a big storm coming in the future and all conveyance systems, whether open channel or piped, must be designed for such a storm. The standard convention is to design for a 100 year storm. A minimum depth of 3” should be provided, but over time, you may find that a greater depth (and therefore, a greater width) is needed. It does not hurt to start with a depth greater than 3” so long as the side slope ratios and other considerations are followed.
Construction
Unlined Swales
Unlined swales are the easiest to construct:
- Dig the shape and depth of the swale that you’d like, based on the guidance discussed above. If native soils will be exposed to rain before the next step, clay particles may clog the surface. So keep native soils covered with (weed seed-free) straw, compost, or jute fabric. This can be left in place if planting or removed if lining with rocks.
- Plant the bottom with vegetation per the guidance in “4 Build a Rain Garden” or line with a 3” minimum depth of rocks.
- Direct runoff to the top of the swale by disconnecting your downspout per “2 Disconnect Impervious Areas”. If using a vegetated swale, wait 3 months before introducing runoff to give the plants time to establish; erosion will be less likely.
Lined Swales
Lined swales are a little more difficult to construct.
To build a lined vegetated swale:
- Use erosion control methods such as biobags, wattles, or compost berms downhill of the excavation to prevent sediment from leaving your property while you dig.
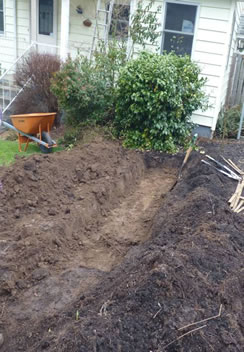
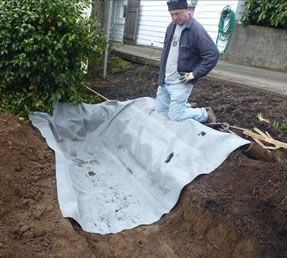
- Since a liner must be placed at the bottom and up the sides, over-excavate a trench the size and shape of the swale you’d like, plus another 12” to 24” of depth (depending on the guidance offered above on vegetation type). Set soils you remove to the side of the trench (Figure 6).
- Line the bottom and sides of the trench with an impermeable material (Figure 7). If plastic, lay down a single, continuous piece. If using bentonite clay mats, seal the edges together as directed by the manufacturer. Try to get the sides of the trench as vertical as possible before installing the liner. In clays, this will be easy but sandy soils, more difficult. Vertical slopes will help ensure that there aren’t very shallow soil depths along the top edges of the swale.
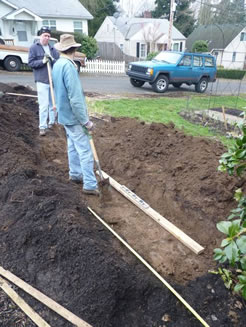
- The swale must drain out the bottom to keep the plants alive (see Figure 8).
- If swale length exceeds liner length, then make sure: 1) the bottom of the swale slopes down, away from important infrastructure and 2) that water will run along the interface between the liner and the soil and into the native soil at the end of the liner. Once water reaches native soil, it should infiltrate.
- If swale length is the same length as the liner length needed, then place a 10’ long perforated pipe (with cleanout or other maintenance access) at the lowest elevation on top of the liner. Connect this perforated pipe to a non-perforated pipe on the other side of the swale. You’ll have to cut the liner at that connection point, so make sure that you use the appropriate cement, wet/dry glue, or other method to seal the liner-pipe interface. By placing the pipe in the corner, it will be easier to cover the pipe with a rock separation layer per the detail in Figure 3. Substituting a geotextile sock around the perforated pipe will result in clogging.
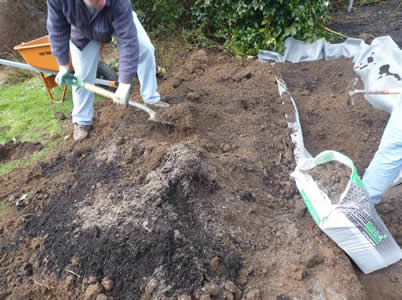
- Amend soils (use what you dug up and set aside) per “10 Amend Soils for Bioretention” (see Figure 9). A portion of the soil will not be needed, since amendments will have bulked up the soil and the shape of the swale will have also reduced the volume needed.
- Place soil back over the liner. (Figure 9).
- Reuse leftover soil somewhere else. If stockpiling, to prevent sediment from leaving your property by wind or water, place: 1) biobags, wattles, or a compost berm around the bottom of the pile and 2) jute fabric over the top, using weights to hold it in place.
- Cut excess liner material at the surface.
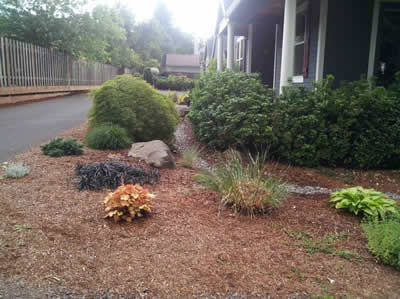
- Vegetate the bottom of the swale with plants per guidance in “4 Build a Rain Garden”.
- Wait 3 months before directing runoff to the swale, to give plants time to establish and to reduce erosion.
- Disconnect your downspout per “2 Disconnect Impervious Areas” into the top of the swale.
To build a lined swale with rocks:
- Use erosion control methods such as biobags or wattles downhill of the excavation to prevent sediment from leaving your property while you dig.
- Since a liner must be placed on the bottom and up the sides, over-excavate a trench the size and shape of the swale you’d like plus another 3” of depth. Set soils you remove to the side of the trench.
- Line the bottom and sides of the trench with an impermeable material. If plastic, lay down a single, continuous piece. If using bentonite clay mats, seal the edges together as directed by the manufacturer.
- Reuse leftover soil somewhere else. If stockpiling, to prevent sediment from leaving your property by wind or water, place: 1) biobags, wattles, or a compost berm around the bottom of the pile; and 2) jute fabric over the top, using weights to hold in place.
- Place 3” of rock on top of the liner (see Figure 10).
Maintenance
Maintenance of vegetated swales is similar to maintenance of other landscapes.
- Pull weeds. Avoid herbicides and opt for integrated pest management techniques like hand pulling. “Cides” are common pollutants found in our waterways and groundwater.
- Maintain a minimum cover over the swale of 85%. If vegetated, replace plants as they die and consider that other varieties (e.g. native) may be needed. If rock lined, push rock back into place.
- Look for erosion. Maintaining cover should help, but if erosion continues, use a method to slow flows, like a stilling basin (aka energy dissipater) or a check dam.
- For vegetated swales: If water sits on top, or otherwise seems to not be infiltrating, the surface may be clogged. This isn’t a problem for conveyance, but is a problem for the plants, which need access to air and water.
- If the facility does not drain within 48 hours, scrape the top 1” layer of soil out of the facility and replace with amended planting soil, which meets the specifications provided. Test the ability of the facility to infiltrate water in order to confirm drainage.
- If facility still does not drain after scraping 1”, you may try scraping another 1” deeper.
- If facility still does not drain after scraping the top 2”, till and replant the facility.
- Debris that inhibits infiltration of water should be removed routinely (no less than quarterly), or when it is discovered.
Fertilizing
Avoid P-K-N (potassium –phosphorus – nitrogen) as these are common pollutants found in waterways and will easily dissolve in water, flow out of the swale bottom onto an impervious surface and likely into a pipe that drains to a waterway. Replenishing the 2-3” of organic compost every year will provide adequate nutrition slowly and safely. Grasses are self-fertilizing, since 30% of their roots die off every year.
Cost Considerations
A lined swale will be more expensive than an unlined swale. Compared to installing a pipe, conveyance swales can be much less expensive. The most commonly used pipe material is plastic, which is flexible so it needs certain subgrade treatments for proper installation. Cost savings over a pipe are in excavation, subgrade compaction, base rock for plastic pipes, and piping. The cost of vegetated swales may be similar to pipes if potted plants are bought; seeding is much less expensive.
Permits
Water quality swales have been used for many years in the Five Counties area and may require a permit. Conveyance swales, such as described here, will probably not need a permit unless you’re using a lined swale and need to install plumbing to drain it out the bottom. In any case, check with your County’s building or development services department to see if a permit is needed. If information in this guidance conflicts with your jurisdiction’s requirements or approach, then follow their guidance instead.
Bibliography
Cahill, Maria, and Derek Godwin. Swales. Fact Sheet. Salem, OR: OSU Extension, 2011.
Photo Credits
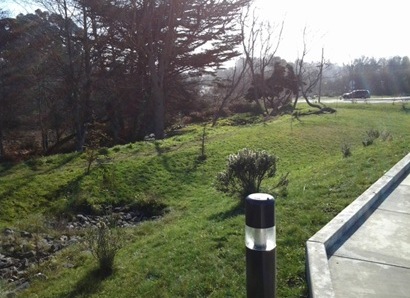
Figure 1: 5C Program, Sandra Pérez
Figures 2-10: Maria Cahill
Download/View the 5C Program Stormwater Management Handbook:
Download by Chapters:
For more information, contact us
©2012. Five Counties Salmonid Conservation Program and Green Girl Land Development Solutions. This publication may be photocopied or reprinted in its entirety or in portions for noncommercial purposes. This publication is available in an accessible format on the 5C web site at http://www.5counties.org/docs.htm. If future documents are based on this document, credit should be given with the following wording: “Portions of this document are adapted from “11ConveySwales.doc ”, http://www.greengirlpdx.com/JOBS/5CSCP/11ConveySwales.doc ©2012, Five Counties Salmonid Conservation Program and Green Girl Land Development Solutions. No risk or liability by either of these organizations shall be assumed for information offered in this document.”
Back to Land Use Planning page
Back to Programs Page
|